
New Zealand South Island 8 Day Campervan Trip + 2 days in Queenstown
- Kerry Black
- Aug 26, 2020
- 10 min read
Updated: Oct 22, 2020
In May 2019, I decided to surprise Dave, my now fiance with a flight and campervan trip to the NZ South Island for his birthday. He had no idea that we were even leaving the country because I had told him that he didn't need his passport which I had already sneakily packed it into my bag.
The surprise trip turned out so much better than I thought and Dave absolutely loved it and so now I thought I would share some of the things we did that we recommend doing, our budget and some added tips and tricks for avoiding crowds in NZ. We went in the off-season at the end of Autumn right after the school holidays and it was so quiet! It also made the flights really cheap! This roadtrip is probably one of the most relaxing ones we have ever been on due to the time of year that we went and not having to rush to each of the campgrounds in order to sure we got a spot every night. This blog post will run through each of our days in NZ, highlighting hikes, sights and some other activities that we recommend. TIP: If you are into photography, this trip will be right up your alley!

Itinerary
Day 1 - Lake Pukaki We arrived at 7pm so walked from the airport to our airbnb and grabbed some dinner on the way. The next day we walked back to the airport to pick up our Jucy Campervan. We hired the Chaser which came with a shower and toilet. I have to say that the shower was probably not necessary as we only used it once but the toilet was very handy as it saved us time on finding toilets along the way. Once we were in our camper, we headed straight to the nearest grocery. Then we headed to Lake Tekapo with a stop off at Lake Dunstan on the way for a snack.

We then kept driving to Lake Pukaki and arrived just before sunset with enough time to take pictures of the gatorade blue colour lake and find a free camping spot. We had an awesome camp spot with a view of the lake. There were no showers or toilets at this campground.


Day 2 - Lake Tekapo
After having a quick breakfast in the van we headed straight to Lake Tekapo and grabbed some coffees from one of the cafes there before exploring the Lake and getting some shots. Lake Tekapo was absolutely gorgeous and it was a really beautiful day so we hung around the Lake enjoying the sun for a while.


After Tekapo, we continued driving to find a campground in Mount Cook National Park and decided to stay at White Horse Hill Campground (non-`powered sites) which was a paid campground ($15 per adult per night) but bookings were not required. There are toilet blocks at this campground but no showers. Showers (coin operated) are available at a public shelter in Mount Cook Village (2.5km from campground). We stayed at this campground for two nights but could have easily stayed longer as there are lots of hikes in the area. We will definitely be going back.


Camping in Mt Cook, we were able to get some amazing astrophotography shots around the campground as the light pollution out there is pretty minimal.


Day 3 - Hooker Valley Track and Tasman Glacier (Mount Cook NP)
We spent the day exploring Mt Cook NP and did a couple of the hikes. Unfortunately the Hooker Valley Track was closed at the first swing bridge so we were only able to do a small section of the hike but from what we saw, the HVT totally lives up to expectations!


The photos above are all from the small section of the Hooker Valley Track that we were able to do and the photos below are from the Tasman Glacier Track.


After our day of hikes, we paid for a hot shower in Mt Cook Village and went to the pub for some hot chips to warm up. Mt Cook is very cold in May and we actually brought a hot water bottle with us and an extra blanket as the van was pretty cold at night without heating.
Day 4 - Hot Tubs Omarama (on the way from Mt Cook to Wanaka)
I was extremely keen for a hot tub experience in NZ as it was so chilly while we were there. Ideally I wanted to have a hot tub right after we did the Roys Peak hike in Wanaka but we came across some tubs on the way to Wanaka that we couldn't pass up on. The place was called Hot Tubs Omarama which I have linked here:
The experience was so awesome and we had our own little heated cabin room right next to our hot tub to get changed in and keep our belongings. There were also hot showers in the main office building that we were able to use after.


On the way to Omarama, we stopped off on the side of the road a couple of times to take some pictures of some really incredible glacial blue lakes. The first stop was Lake Ruataniwha which we got to by turning off down a side road and pulled over to get some pictures. (Pictured below). We got the first picture just off the highway. You can actually see this spot in the second picture. I think there was a bit of a carpark there from memory. The second shot was taken a little further in and down a road which soon became dirt (as seen in drone shot). You can also see from this shot how absolutely empty it was! This was one of the many perks of going in the off-season at the end of Autumn.


The second stop was completely random and I think we just pulled over because I liked the look of the orange trees against the blue water. Then we decided to put the drone up quickly and got this!

Along the way to Wanaka we also stopped at Lindis Pass which was a really picturesque section of the road. Photos from this spot are below. Lindis Pass also has a little viewpoint tourist stop a bit further on from this road. We also stopped here and did a small 5 minute walk as the sun was setting.


The total drive from Mt Cook to Wanaka would have been about 2.5 hrs if done in one go, however we spent the whole day doing the trip due to all of our stops and hot tub sessions.
When we arrived in Wanaka, we chose to stay at one of the Caravan Parks and set up and cooked dinner for the night. One thing I really noticed, was that New Zealand Caravan Parks have great kitchens. This one had a kitchen and an undercover outdoor eating area complete with fairylights which kind of made you forget that you were in a caravan park and instead maybe a cool hostel?
We had quite an early night and prepared our clothes and food for the next morning as we had a 4am wake up planned.
Day 5 - Roys Peak and Wanaka TIP: If you are looking to do a short but epic hike on the NZ South Island, this is it. The hike is 16km return and you should allow for 5-6 hours return. I highly recommend going at sunrise as it is a very popular hike and will started getting quite crowded once the sun is up. Be sure to bring snacks and wet weather gear as the weather can change extremely quickly.
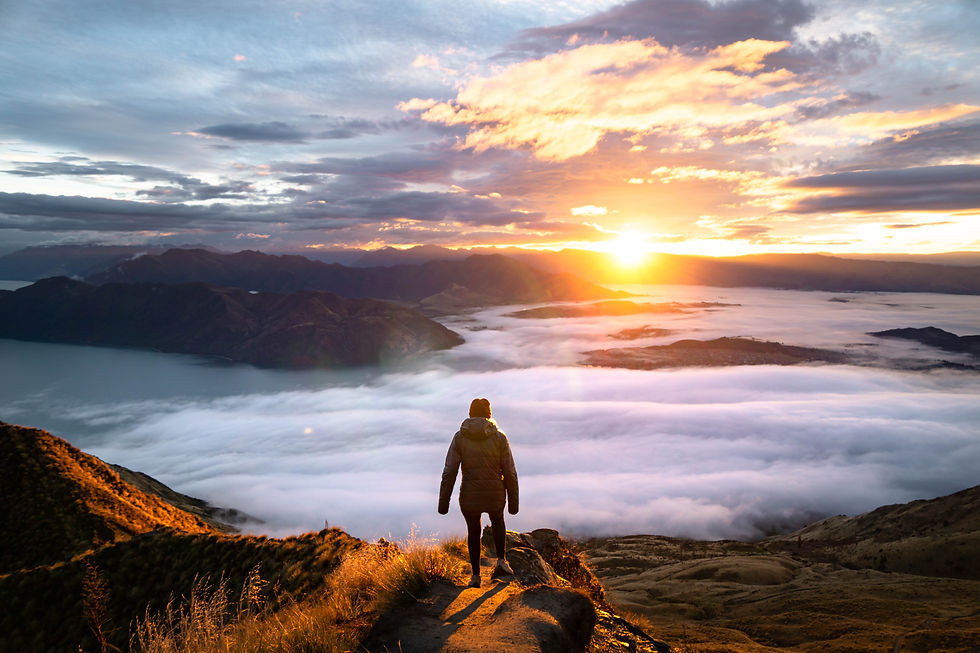
After waking up with our alarms at 4am, we drove straight to the Roys Peak car park. Warning: It is illegal to camp in the carpark which is why we paid for the caravan park. We also wanted to be able to have hot showers after the hike which were so so good! It was about a 7 minute drive from our campground to the trailhead. Once we were at the carpark, along with quite a few other people, we had something quick to eat and got ready to start hiking. Getting out of the van was unreal as there were a few other groups walking around with headlights on, looking for the trailhead which seemed to fill the air with a sense of excitement. The hike up was a pretty strange experience as we had not done a hike like this one in the dark before. The trail consisted of a wide dirt path with lots and lots of switchbacks. Probably the worst part about hiking up in the dark was that you couldn't tell how far you had to go. We constantly thought that we were almost there and then would look up and see headlights way way off in the distance which meant there was still a long way to go. It took us about 2.5 hours to get to the main view point which is where everyone takes their photos. You can go a little further than this to the very top which we did after watching the sunrise. The sunrise was incredible and we were really lucky to get an awesome cloud inversion. After taking our pictures we continued onto the very top of Roys Peak where we could see storm clouds rolling in extremely quickly so decided to hurry along and start the gruelling trek back down which was a smart decision as the fog started rolling in around 5 minutes later.
The hike back down was so much more painful than going up. Dave had a pair of hiking poles which we ended up sharing because the load on our knees and leg muscles was just too much and we arrived at the bottom in agony and really wished that we had a tub experience to look forward to later that day. So all in all, this hike is tough on your legs but the view at the top is so so worth it!


After the hike, we went back to our campground to freshen up and then did a bit of sightseeing
around Wanaka and saw the Famous "Wanaka Tree" (pictured below).


We then set off to drive to Lake Te Anau which was about a 3 hour drive from Wanaka but ended up stopping to camp on the way as we were running pretty late and luckily found an awesome free campsite on the site of the road by Lake Wakatipu.


Day 6 - Lake Te Anau and Fiordland National Park

We drove the rest of the way to Lake Te Anau, had lunch by the lake and went to the visitors centre to decide on a hike for the next day and then kept driving to Milford Sound. The lake was very stormy-looking but beautiful.
As we got closer and closer into Fiordland National Park, it felt more and more like we were entering another much wetter world.


Eventually we arrived at our paid campsite at Milford Sound Lodge. We pre-booked this one around a day or two before arriving as we didn't want to drive all of the way into Milford Sound and not be able to stay. I think there are other campsites that you can stay at in the area but it was really worth having a kitchen and hot showers as the area was so cold and rainy.
Day 7 - Milford Sound Cruise and Lake Marian Hike
We spent our time in Milford Sound on the typical Milford Sound boat cruise which is a must if you are here. Pictured below:


After our boat cruise, we had a quick lunch and drove to the Lake Marian carpark to start our hike, which was about a 30 minute drive from Milford Sound. Lake Marian is an alpine lake in a hanging valley above the bushline which means you hike up to get to it. The entire hike is about 10km return and you should allow for about 3 hours return. We hiked it quite late in the day and were in a rush to get back to the carpark before it go dark. The trail is a tramping track and so a little tricky at times. Wear good shoes and be prepared for some scrambling.
Just before we arrived at the lake, we passed through the greenest mossiest area I have ever seen and then after scrambling through the bush, reaching the lake was pure magic.


The photo above is at the very start of the hike. If you cross this bridge you know you are going the right way.
After our hike (it was dark at this point) we drove back to Lake Te Anau and stayed the night at a caravan park.
Day 8 - The drive back to Queenstown, Arrowtown and returning our Camper
From Lake Te Anau, we drove back to Queenstown and stopped off in Arrowtown on the way to chase the last of the Autumn colours.


After dancing around and taking photos in the autumn leaves, we dropped off our luggage at our motel. We stayed at Autoline Queenstown Motel which was lovely and we so appreciated the warm underfloor heating in the bathroom and comfy bed after living the van life for 7 days. We stayed in Queenstown for the next 3 nights before flying back to Sydney.
After dropping off our luggage and checking in, we returned our campervan to the Jucy section at the airport, and caught the bus back. We absolutely loved our Jucy Van and loved the way all of the other Jucy van tourists waved at us as they went past. I'm not sure if this happens with other campervan companies but it was a nice surprise :)
Day 9 and 10 - Queenstown
While we were in Queenstown, we had one sunny day which we spent doing a hike and one completely rainy day walking around town.
The hike that we did was called Ben Lomond which had such great views! To get to the trail head, we caught the Skyline Queenstown up to the restaurant, where you then follow the signs up past the Luge to the official start of the hike. There are two versions of this hike that you can choose to do. The short version is up to Ben Lomond Saddle which you should allow about 3-4 hrs return and the longer version takes you up to the Ben Lomond Summit which should allow 6-8 hrs return. The entire hike is 11km return. We only reached the saddle as Dave had bad knees from not enough stretching on Roys Peak (As it was a surprise trip I hadn't given him enough warning to stretch in advance of our holiday - he has bad knees). You will know you've reached the saddle when you come to a chair. The perfect spot for a rest stop if you are going all the way, and the views are still absolutely incredible. We then had lunch at the cafe at the top of the Skyline and went on the Luge which is sort of like a Toboggan but so much more fun! Highly recommend!


We spent our last day exploring Queenstown and shopping and eating because its was pouring with rain all day. I did manage to take this moody looking photo of the forest though.

To summarise, I've never been to NZ before, but I think going in the off-season was fantastic and I would definitely do it again, although I do want to see the Lupins at some point which are there in Summer... There were less crowds, the flights and van hire were cheaper and the autumn colours were stunning! Take us back!
Kerry and Dave xx
Approximate Budget - all in AUD
Below are a few of our main costs. We also tried to budget by buying groceries and cooking our own as much as we could. Our total trip cost including food, campsites, activities and petrol would have been a little over $2,000. Flights: $406 PP return flight from Sydney Campervan Hire (8 days): $315 (Camper), $219 (stress free insurance cover), $15 (additional driver fee), $15 (2 x camping chairs), $89 (Queenstown surcharge) Queenstown arrival accomodation (1 night): $95 Queenstown Motel (3 nights): $391 Travel Insurance: $125


Comments